- LIKEAHACK
- Posts
- IKEA Hack Saturday: Three Creative Hacks, One Expert Tip, and a Fresh Idea
IKEA Hack Saturday: Three Creative Hacks, One Expert Tip, and a Fresh Idea
Plus: How to find that elusive stud behind the drywall
@ ikeahack
July 08, 2023
Hej and welcome to IKEA Hack Saturday! Consider this weekly email as your Swedish July - short, but filled with unending brightness. Here we have curated for you three captivating IKEA hacks, an insightful tip from our experts, and a new way to transform your furniture!

3 GREAT HACKS
With #ikeahack tagged over 600k times yearly, we receive a treasure trove of DIY ideas. Each week we share 3 great IKEA hacks shared with us that we think you’ll like (and we didn’t post). Here’s what caught our eye this week:
#1💎
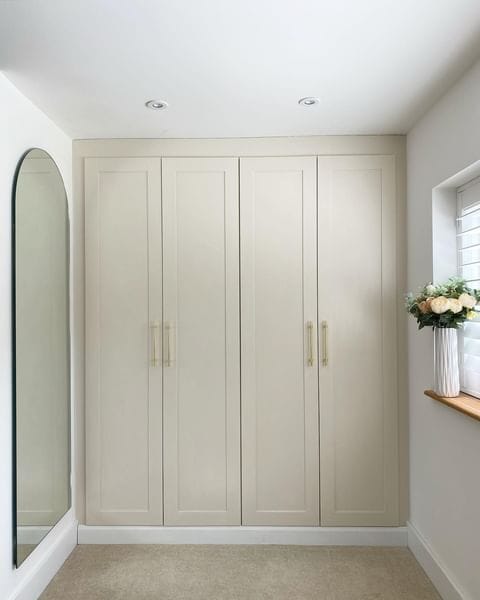
Why we like it: We really like this DIY built-in wardrobe IKEA hack for its impressive versatility and customization. The project showcases how IKEA pieces can be creatively adapted to personal needs. We appreciate the user's clear cost breakdown and detailed process. The aesthetic result, with its neutral paint, gold handles, and mirror, is elegantly timeless. Lastly, using MDF for a built-in look demonstrates innovative thinking, exemplifying the limitless potential of IKEA hacks.
#2💎

Why we like it: This IKEA Pax hack for creating a laundry/mud room unit demonstrates excellent use of space. The step-by-step procedure, from building a sturdy frame with timber to securing units and modifying them for utility access, exhibits remarkable practicality. Additional features like vibration pads for the washing machine and floating shelves add to its convenience. This hack also highlights the creative versatility of IKEA's Pax and Komplement units, making it a favorite of ours.
#3💎

Credit: herzenstimme
Why we like it: We love this DIY fire bowl project for several reasons. First, it's incredibly easy to do, yet the outcome is stunning, adding an element of rustic charm and coziness to any outdoor space. It brings a sense of tranquillity, providing both a visual spectacle and a comforting warmth. The fire bowl is an impressive centerpiece for evening gatherings, creating an inviting and warm atmosphere.

1 PRO TIP
Hey everyone! We've all been there - the perplexing quest of finding that elusive stud behind the drywall. You've got a heavy mirror, a robust bookshelf, or maybe a brand-new flat-screen TV that needs a secure mounting, but where exactly do you fasten it?
If you've experienced this frustration, you're not alone.
I will take a moment and share a cool trick that'll help you easily locate a stud in the wall. Using just a magnet and a flashlight, you'll be a pro at stud finding in no time. Let's dive right in!

Finding a stud behind drywall is a crucial skill when you need to hang a heavy picture, install a shelf, or run cables. One common method involves using a magnet and a flashlight, and I'll explain it to you in detail.
The magnet is used because the drywall is held onto the studs by metal screws or nails, which the magnet can detect. You'll need a strong magnet for this to work effectively. A flashlight helps you see the slight depressions or bumps on the wall surface that can indicate the location of a stud.
Here are the steps:
Preparation: You will need a strong magnet and a flashlight. Some people prefer to use rare-earth (neodymium) magnets because of their strong attraction to metal. Make sure your flashlight is bright enough to highlight subtle surface features on your wall.
Start Close to a Corner or an Outlet: Studs are typically spaced 16 to 24 inches apart from each other. In the USA, electrical outlets are usually attached to studs. So, a good place to start your search is either at a corner of the wall (where there's always a stud) or next to an electrical outlet.
Use the Magnet: Tie a string around your magnet, then let it dangle against the wall and slide it around. When the magnet is over a screw or nail, it will stick to the wall. This can indicate the location of a stud. Start from the corner or outlet and move horizontally across the wall.
Use the Flashlight: Hold the flashlight at a low angle against the wall (almost parallel to the wall surface). This will create shadows that make indentations or bumps more noticeable. These surface features might correspond to the location of nails or screws, indicating the presence of a stud.
Mark the Stud Locations: Once you've located a stud, mark its location with a pencil. Now, you can either measure 16 or 24 inches from that point to find the next stud (most houses follow one of these standard spacings), or you can use the magnet and flashlight technique again to confirm the location of the next stud.
Verify Your Findings: To ensure that you've located the stud correctly, you could use an electronic stud finder for confirmation, or make a small, easily repairable hole with a thin nail or awl. If you've hit the stud, the nail will not go in easily once it hits the stud.
Pro Tip: When securing objects to wall studs, always opt for a flat head screw. Unlike the common 'deflect' or bugle head screw, which sinks into the material, a flat head screw sits flush, providing a stronger hold and won't sink under the weight of the object. This simple choice ensures a more secure and safer installation.
Remember, practice makes perfect. Don't worry if it takes a bit of time to get the hang of finding studs this way. With some practice, you'll soon be able to locate them quickly and accurately.
- Urban

Just a friendly reminder to always use proper personal protective equipment (PPE) when tackling your DIY projects. Let's make sure we're enjoying our creations without risking our well-being. Stay safe, friends!
Follow Urban at @thenordiceye
IDEA OF THE WEEK
THE IDEA: An IKEA Pax system cleverly hacked into a comprehensive storage solution.
THE INSPIRATION: 👇

THAT’S A WRAP. HAVE A GREAT WEEKEND!
We hope you love the new format! Feel free to share it with others you think may enjoy it. You can copy and paste this link: https://newsletter.likeahack.com/
P.S. Which hack was your favorite? Reply with the number (#1, #2, or #3!)

Reply to this email to say hi or to ask any questions.
© COPYRIGHT 2022 | Like-A-Hack (likeahack.com) is an independently operated community-run newsletter and is NOT related to IKEA®, IKEA.com, or the IKEA Group. IKEA® is a registered trademark of Inter-IKEA Systems B.V. Any and all links to IKEA.com are presented for reader convenience only and do not imply IKEA's approval of this newsletter and/or the modification of its products. IKEA® and Like-A-Hack (likeahack.com) are not liable for any product failure, injury or damage resulting from the application of hacks featured within this newsletter or on the website.