- LIKEAHACK
- Posts
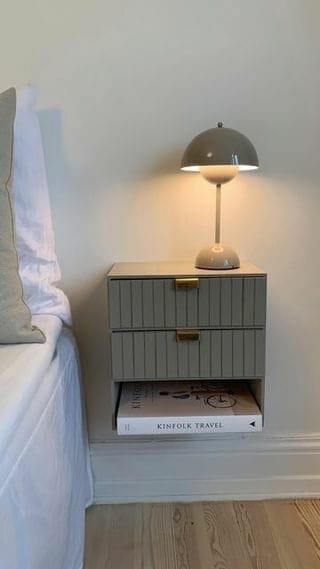
- 🛠️ DIY Floating Bedside Table with IKEA MOPPE and RÖDEBY - Pro Tips Edition
🛠️ DIY Floating Bedside Table with IKEA MOPPE and RÖDEBY - Pro Tips Edition
Plus: Mastering the Art of Drilling for IKEA Hacks
@ ikeahack
April 08, 2023
Hej Hej! Welcome to this week's newsletter, where we dish out the freshest tips and ingenious tricks to fuel your creative spirit for your next IKEA hacking adventure.
Today’s estimated read time: 4 minutes and 52 seconds
WHAT YOU WILL LEARN TODAY:
How to create a stunning floating bedside table.
Woodworking wizard Urban Kantola will teach you the art of drilling.
A new idea that might give you some inspiration.

IKEA HACK TUTORIAL
We're excited to feature an incredible IKEA hack from the talented @nannabodeval. She has skillfully transformed the MOPPE Mini storage chest and the RÖDEBY Armrest tray into a stunning floating bedside table.
The combination of carefully chosen paint and elegant gold pulls elevated this creation to a whole new level of sophistication. Get ready to be inspired as we delve into the details of this chic and unique piece that can effortlessly enhance your bedroom's aesthetic.

Let's get started with our step-by-step guide!
WHAT YOU NEED: First, you'll need to gather your materials. Here's what you'll need:
IKEA MOPPE Mini Storage Chest
IKEA RÖDEBY Armrest Tray
Wood glue or assembly glue
Sandpaper
Glue clamps
Drawer pulls
Paint and brush
💡 Pro Tip: Select high-quality wood glue and make sure your paint is appropriate for wood surfaces to ensure a long-lasting finish.
Step 1: Glue the drawers together
Apply wood glue to the sides of the drawers in the same row. Hold them together with glue clamps until the glue dries.
💡 Pro Tip: Spread the wood glue evenly and avoid using too much to prevent excessive squeeze-out, which can be difficult to remove later.
Step 2: Measure and cut the RÖDEBY Armrest Tray
Measure the size of the pieces you need to cut from the armrest tray for the fronts of the drawers. Saw off the measured piece, then sand the edges with sandpaper.
💡 Pro Tip: Use a fine-toothed saw or a power tool like a jigsaw for cleaner cuts, and mark your measurements with a pencil before cutting.
Step 3: Attach the RÖDEBY pieces to the drawers
Glue the cut pieces from the armrest tray to the fronts of the drawers using wood glue or assembly glue.
💡 Pro Tip: Wipe off any excess glue immediately with a damp cloth to ensure a clean finish.
Step 4: Paint the dresser
Paint all visible surfaces on the drawers and the rest of the dresser with your chosen paint color. Allow the paint to dry.
💡 Pro Tip: Apply multiple thin coats of paint, allowing each coat to dry before applying the next, for a smoother and more durable finish.
Step 5: Mount the drawer pulls
Saw a small slit inside the glued drawer fronts where you want to place the drawer pulls. Fill the slit with glue, then insert the drawer pull into the slit so that it sits securely.
💡 Pro Tip: Use a drill with a small bit to create a pilot hole before sawing the slit, making it easier to control the saw and achieve a precise cut.
Step 6: Hang the chest on the wall
Mount the MOPPE Mini Storage Chest on the wall using appropriate hardware (not included).
💡 Pro Tip: Use a stud finder to locate wall studs, and secure your floating bedside table to the studs for maximum stability and support.
Step 7: Assemble your floating bedside table
Insert the drawers into the chest, and your stylish floating bedside table is complete and ready for use!
Good luck!

THE NORDIC EYE
Introducing Urban Kantola, a colossal Swede with IKEA-flat-pack-conquering skills! Today, he'll share his Viking-worthy expertise to help you dominate any project. So let’s channel our inner Swede and join Urban for another DIY lesson.
Mastering the Art of Drilling for IKEA Hacks: Preventing Blowout and Ensuring Precision
Hej, Urban here. 👋
When it comes to IKEA hacks, drilling is often an essential skill. As you modify and repurpose IKEA furniture, you’ll need to drill holes for mounting hardware, shelves, or other decorative elements. Allow me to share some quick tips I hope will help you.
Preventing Blowout
Blowout occurs when the drill bit exits the back of the material, causing splintering and damage to the surface. To prevent this, you can use a simple trick: place a block of wood behind the material you’re drilling. The block will provide support for the material and help prevent splintering as the drill bit exits.
Using a Centre Punch
A center punch is a crucial tool for controlling the start of the drilling process. Before drilling, use the center punch to create a small indentation at the desired hole location. This will help guide the drill bit, ensuring accurate positioning of the hole and reducing the chances of the bit slipping or “dancing.”
Drilling for Shelf Pins: The 5mm Rule
If you’re drilling holes for shelf pins, always use a 5mm drill bit. This is the standard size for system holes in cabinets around the world. Using a 5mm bit will ensure compatibility with most shelf pin hardware, making your IKEA hack more versatile and functional.
Using Tape, Stoppers, or Blocks for Depth Control
One common issue when drilling is going too deep or drilling through the material accidentally. To avoid this, you can use tape, a stopper, or a block of wood to control the depth of your drill.
Tape: Wrap a piece of tape around the drill bit at the desired depth. As you drill, the tape will act as a visual guide, letting you know when you’ve reached the correct depth.
Stopper: Invest in a drill stopper, which is a small collar that attaches to the drill bit and prevents it from going too deep. Adjust the stopper to the desired depth and tighten it in place.
Block of Wood: If you have a block of wood with the same thickness as your desired drilling depth, you can use it as a makeshift stopper. Place the block on the drill bit, then drill until the block reaches the surface of the material.
Here is great video from @lee.mei.10048379 demonstrating using a block of wood behind the material you’re drilling.

By using these tips and tricks, you’ll be able to prevent blowout, ensure accurate hole placement, and avoid drilling too deep.

Just a friendly reminder to always use proper personal protective equipment (PPE) when tackling your DIY projects. Wearing safety glasses, gloves, ear guards, and other appropriate safety equipment can truly be a game-changer in ensuring your safety. Let's make sure we're enjoying our creations without risking our well-being. Happy crafting and stay safe, friends!
Follow Urban at @thenordiceye
IDEA OF THE WEEK
THE IDEA: Create a bedroom bench seat with storage using the IKEA NORDLI dresser.
THE INSPIRATION: 👇

THAT’S A WRAP. HAVE A GREAT WEEK!
Did you love this newsletter as much as we loved creating it? If so, would y'all do us a huge favor and share it with others you think may enjoy it? You can copy and paste this link: https://newsletter.likeahack.com/
This newsletter is a labor of love and takes our team 5+ hours to research and write. We may be a small team, but we pour our hearts and souls into creating content that we hope you will enjoy.
So, from the bottom of our hearts, we want to say thank you for all your support. It means the world to us and helps us keep doing what we love!

PS: Reply to this email to say hi or to ask any questions.
© COPYRIGHT 2022 | Like-A-Hack (likeahack.com) is an independently operated community-run newsletter and is NOT related to IKEA®, IKEA.com, or the IKEA Group. IKEA® is a registered trademark of Inter-IKEA Systems B.V. Any and all links to IKEA.com are presented for reader convenience only and do not imply IKEA's approval of this newsletter and/or the modification of its products. IKEA® and Like-A-Hack (likeahack.com) are not liable for any product failure, injury or damage resulting from the application of hacks featured within this newsletter or on the website.