- LIKEAHACK
- Posts
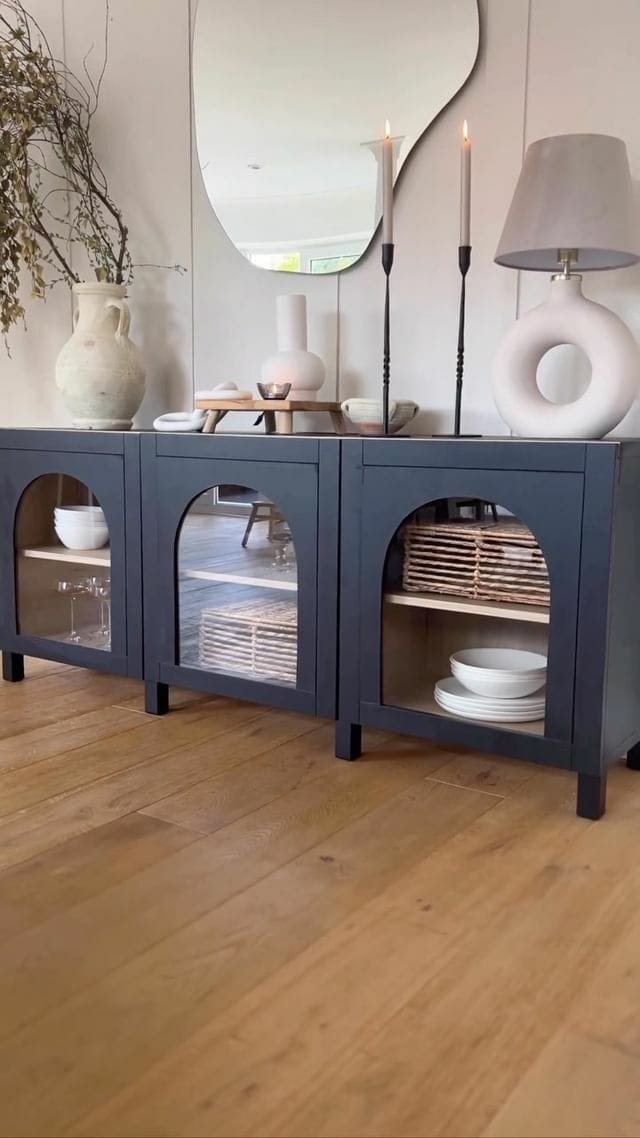
- 🛠️ IKEA Hack: An amazing IKEA Besta Hack
Hej there, fellow DIY enthusiasts! We're the IKEA Hack newsletter, bringing you the best of Swedish ingenuity and creativity. Just like the world-famous Swedish Chef, we're all about mixing things up and creating something unique.
Today’s estimated read time: 4 minutes and 12 seconds
WHAT YOU WILL LEARN TODAY:
How to take on an IKEA Besta Hack
The Nordic Eye, Urban Kantola will teach you how to work with MDF
A new idea that might give you some inspiration.

IKEA HACK TUTORIAL
Our good friend Kate @our_bears_home shared this incredible IKEA Besta Hack with us this past week. We received a lot of questions about how to build something similar, so naturally, we wanted to share the steps she took to create this beautiful piece.
Let's get started with the step-by-step guide that was shared with us by Kate!
WHAT YOU NEED: First up, you'll need to gather your materials. Here's what you'll need:
BESTÅ shelf 56×36 white-stained oak effect (x3)
SINDVIK glass door 60×64 black-brown/clear glass (x3)
STUBBARP leg black-brown 2-p (x4)
BESTÅ TV bench 180x40x64 white-stained oak effect
BESTÅ soft closing/push-open hinge 2-p (x3)
B.I.N Zinsser primer Rust-Oleum Chalky Finish Furniture Paint (in natural charcoal)
6 mm MDF board Rust-Oleum Furniture Lacquer
Gorilla Glue Clear
Step #1: Cabinet Construction
Assemble the TV bench by joining the shelf pieces to the skeleton. Once you've got the basic structure together, attach the STUBBARP legs to the base. Flipping the unit over and attaching the legs is a simple and effective way to create a stylish and functional piece of furniture.

Step #2: Priming Time
Before painting, prime all the surfaces you wish to paint with B.I.N Zinsser primer. This essential step ensures stains won't bleed through and odors are blocked. The primer also provides excellent adhesion to the surface without requiring any sanding beforehand. Once you've primed the surfaces, let the furniture piece sit until it is fully dry. Then, attach the hairpin legs using a drill and screws to secure them into place.
Step #3: Painting Party
After the primer has dried, paint the surfaces with a paint of your choice. Our friend used Rust-Oleum’s chalky finish furniture paint, which gave a matte finish and added a pop of bold but neutral color. Allow the surfaces to dry and apply a second coat when done.
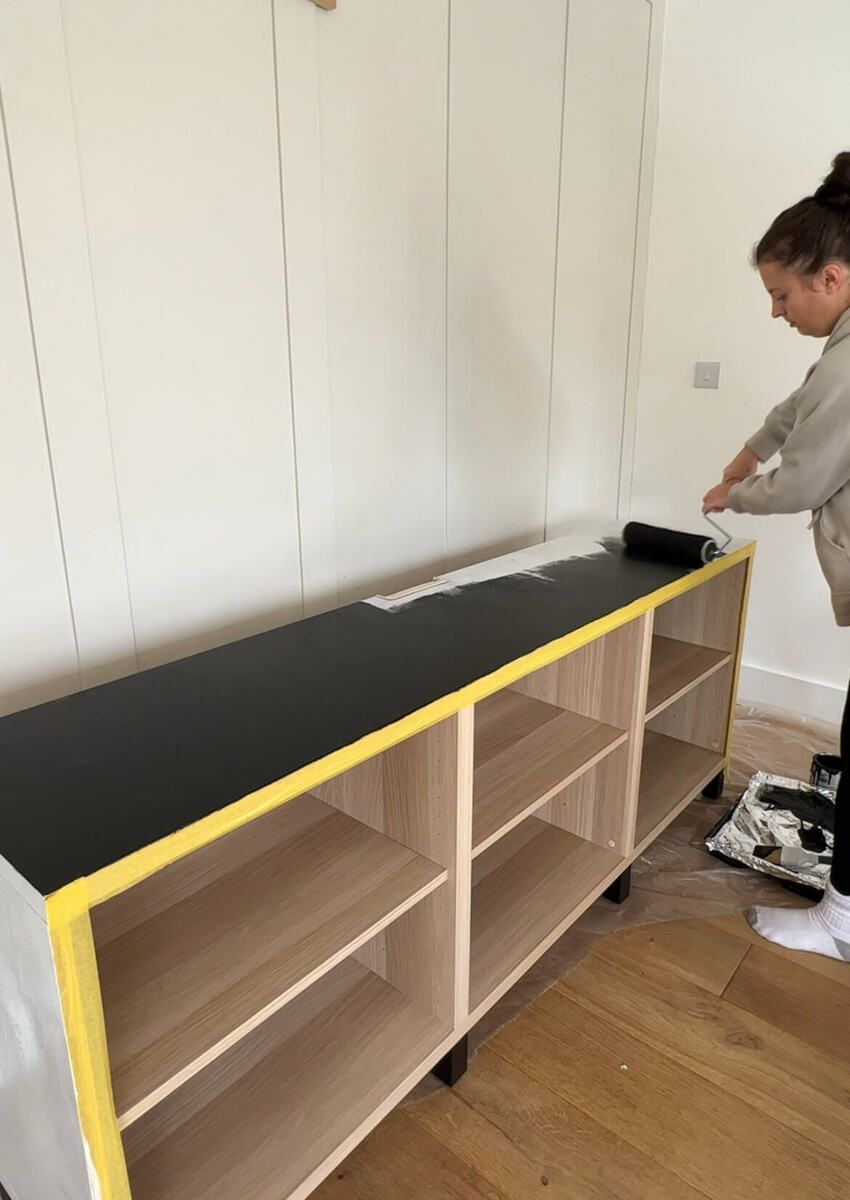
Pro tip: Use a paint roller, especially if you’re new to painting. It’s quick, easy-to-use, and applies an even coat of paint!
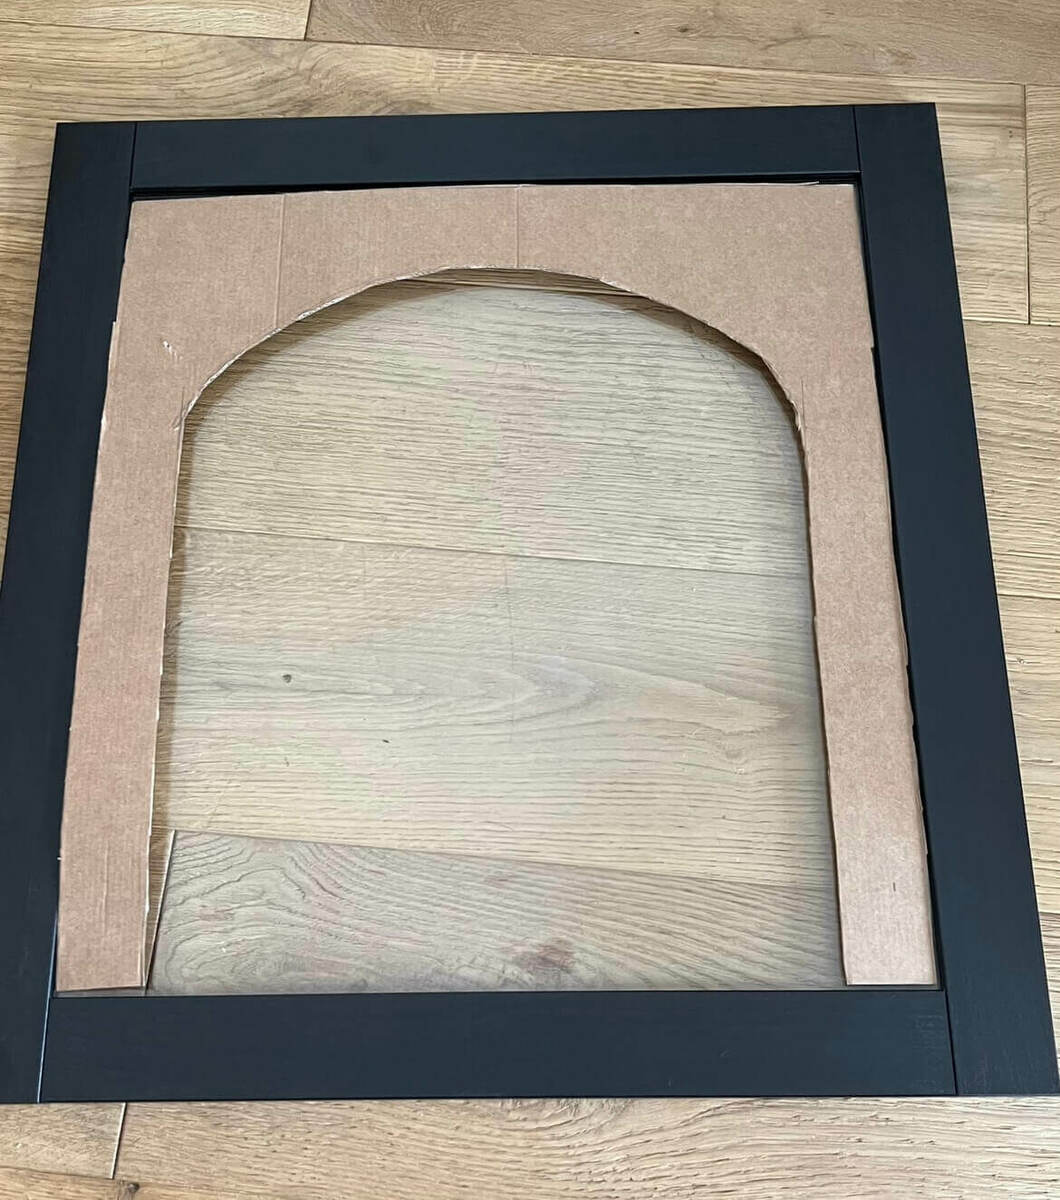
Step #4: Door Details
To add doors to the front of your cabinet, cut out a 6mm (1/4”) MDF board to fit right into the glass section of the SINDVIK doors. Next, cut out an arch shape in the center. Our friend used a (new) toilet seat as a utensil, and it created the perfect arch shape! Once you've got the right shape, prime and paint the MDF pieces and door frames using the same products you used for the cabinet.
Step #5: Sealing Success
Seal all painted surfaces with lacquer, preferably Rust-Oleum furniture lacquer. This modern furniture finish gives a high-end look to the furniture piece while also providing protection against water and liquids. Apply an even coat and let the lacquer dry.
Step #6: Door Assembly
To finalize your masterpiece, apply gorilla glue to the edges of the arches you cut out earlier and attach them to the SINDVIK doors. Finally, mount the doors onto the unit.
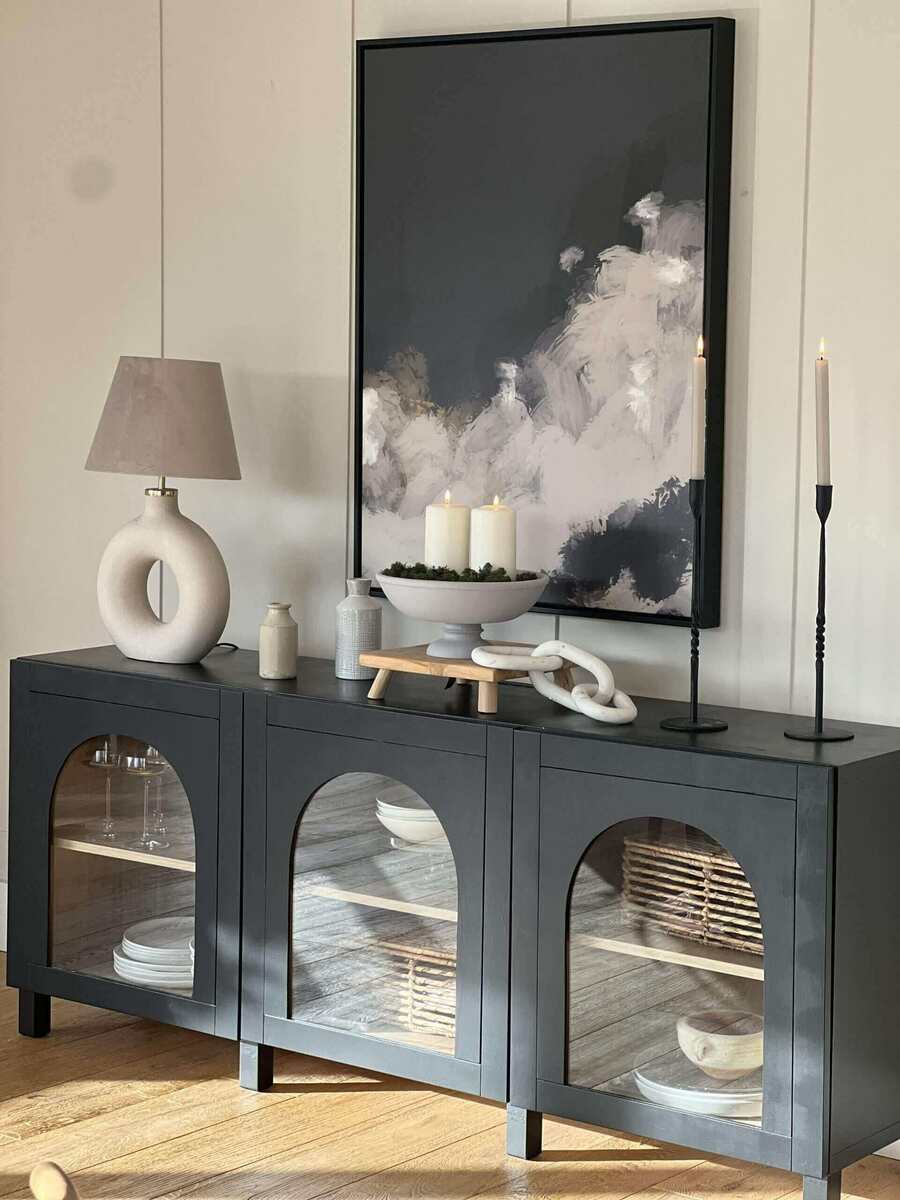
Now it's time to style your customized IKEA Besta storage unit! Add your favorite accessories like ceramic vases, candlesticks, and coffee table books, and place it in various parts of your home. From a foyer table to a sideboard to an entertainment complex, it can serve multiple purposes as per your needs — and add a punch of style to your interior with a piece that speaks to your personality! Remember, friends, with a little creativity and elbow grease; you can transform any piece into something extraordinary!
Be sure to check out Kate’s amazing blog: https://ourbearshome.co.uk/ and give her a follow at @our_bears_home
Her blog is full of great ideas and inspiration. A massive thank you to Kate for sharing this amazing hack with us! ❤️

THE NORDIC EYE
Urban Kantola, our Swedish handyman with a natural talent for problem-solving and a lifelong affinity for tools, is ready to share some wisdom. This week, Urban will be sharing his insights on working with MDF.
TIP OF THE WEEK - TIPS FOR CUTTING AND SANDING MDF.
Hej, Urban here. 👋
A great tip for cutting MDF is to score with a sharp knife along the line you want to cut. This will cut the harder surface of the MDF, so when the jigsaw blade moves up and down, it will not be able to grab the surface and pull it up (blowout).
This is, of course, as long as you stay on your line or slightly beside it and then sand the rest. Even when sanding, the score cut will help you with chipping. It is hard to sand along the edge 100%, and it is easy to grab that edge and pull it up.
Another thing to consider with MDF is that the cut edges must be sanded no matter what you used to cut the piece. You will discover if you did a good job sanding the edge after the first thin primer layer.
Do not get disappointed. I often use the first coat of primer to ensure my sanding meets my expectations. Most of the time, you will save time doing it this way rather than sand too much.
Sanding the cut edges on MDF is pretty easy as the material is relatively soft compared to other materials. A sanding block is recommended to ensure the edges stay straight and square with the surface for the best possible result.
Pro tip: Cut a piece of MDF and attach sandpaper to it using glue. This will help you make sanding easier.
Although we love sharp edges, it is a good idea to break the edge ever so slightly. This will help prevent the paint from chipping as it has a somewhat round edge rather than a sharp one.
Skål! (Cheers!)
Urban
Follow Urban at @thenordiceye - he’s got some great content planned that you won’t want to miss. If you have a question for Urban, just reply to this email.

Thank you, Urban!
IDEA OF THE WEEK
IMAGINE: Elevate an #IKEA Tarva dresser with a rustic touch by painting the body a warm, earthy green and the drawers a natural wood finish. Replace the knobs with antique bronze hardware to complete the vintage look.
THE INSPIRATION: 👇

THAT’S A WRAP. HAVE A GREAT WEEK!
Did you love this newsletter as much as we loved creating it? If so, would y'all do us a huge favor and share it with others you think may enjoy it? You can copy and paste this link: https://newsletter.likeahack.com/
This newsletter is a labor of love and takes our team 5+ hours to research and write. We may be a small team, but we pour our hearts and souls into creating content that we hope you will enjoy.
So, from the bottom of our hearts, we want to say thank you for all your support. It means the world to us and helps us keep doing what we love!

PS: Reply to this email to say hi or to ask any questions.
© COPYRIGHT 2022 | Like-A-Hack (likeahack.com) is an independently operated community-run newsletter and is NOT related to IKEA®, IKEA.com, or the IKEA Group. IKEA® is a registered trademark of Inter-IKEA Systems B.V. Any and all links to IKEA.com are presented for reader convenience only and do not imply IKEA's approval of this newsletter and/or the modification of its products. IKEA® and Like-A-Hack (likeahack.com) are not liable for any product failure, injury or damage resulting from the application of hacks featured within this newsletter or on the website.